Integrate Opticks Sensor JS manually
The Opticks Sensor JS manual integration is performed by inserting a small piece of code to your website. This piece of code will then connect to the Opticks servers, analyze each visit, and decide whether it is valid or not based on the rules you've set up for your Sensor JS on the Opticks website.
Integrate Visits
The following instructions are applicable if you integrate directly on your webpage.
If you use a Tag Manager, you can find more detailed instructions here.
This integration option requires the Sensor JS tag to be included in your website's head as follows:
<head>
  <script src="https://opticksprotection.com/o/{SENSOR_HASH}" async></script>
  ...
</head>
Get the SENSOR_HASH from the Sensor JS snippet that the Opticks platform generates in the integration section.
Extra: Adding custom information to the visits
You can add extra information as URL params in the Sensor JS script and Opticks will replace any text in brackets (macros) with the value of that URL parameter storing it in the analysis.
You can use var1 var2 var3 and var4 parameters to store custom information via the Sensor JS script. For example, using the following tag:
<script src="https://opticksprotection.com/o/{SENSOR_HASH}?var1={affiliate_id}&var2={language}" async></script>
...
</head>
If the URL is:
https://mylandingpage.com/example?affiliate_id=371&language=en
That will send var1=371 and var2=en to Opticks, and show that information in the dashboard.
Optional steps
Reading information from Opticks response event
The Sensor JS will emit an opticksEvent callback event when it has finished processing the visit. It contains key information such as Opticks click id, session id and whether it is valid or not. You need to collect this information if you want to send conversions to Opticks. Instructions regarding this event are available here.
Inform Opticks about conversion events
Now that the OpticksJS Snippet is set, the next step to take is to inform Opticks about conversions. Conversions are actions reported by the customer. It can be any action for which the customer is acquiring traffic, such as leads, form registrations, purchases, etc.
Even when using the OpticksJS integration option, conversions can be reported to Opticks servers.
Getting the click id or session id
To integrate conversions, your platform needs to send a conversion postback to Opticks with the Opticks click_id or session id (sid). In order to collect these ids, you need to capture the response from the Sensor JS response event. To do so, please check the previous step or read this article.
Firing the postback
Once you have collected the Opticks click_id or session id (sid), the Opticks postback should be sent either to:
https://opticksstatic.com/conversion?s=session_idwhere session id is the s parameter in the OpticksJS responsehttps://opticksstatic.com/conversion?id=opticks_click_idwhere click_id is the opticksClickId parameter in the OpticksJS response
While not recommended, it is also possible to fire postbacks on the client side. This is useful when firing conversion pixels in a "thank you page" when the user finished the flow and has converted. For example, using a similar snippet in your site:
<img src=https://opticksstatic.com/conversion?click_id=opticks_click_id height="1" width="1" style="display:none" />
SensorJS flow overview
This is a technical schema of how the Opticks JS technology works, including flow execution and ideal best practices.
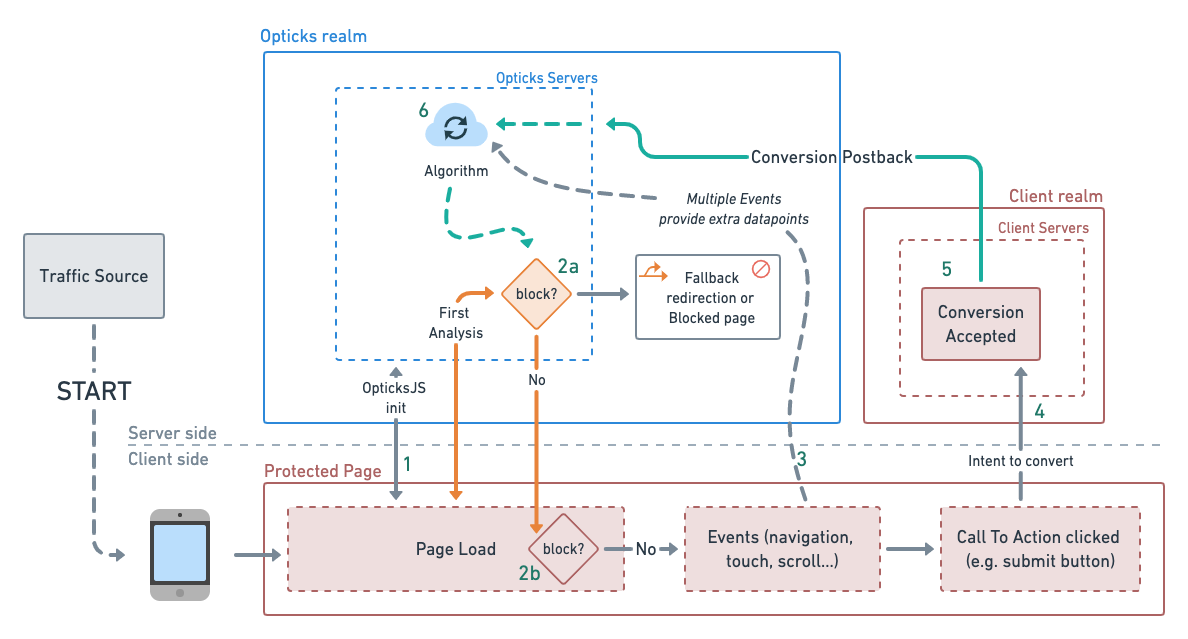
- OpticksJS loads and performs analysis
- Telemetry data arrives to Opticks servers and analysis is executed.
- Analysis is returned from Opticks servers to client side and client side applies business logic based on response (i.e. apply a captcha or disable a button)
- Further user events are harvested and feed to the algorithm. (This Events module must be activated separately).
- User initiates the action to convert.
- The user makes the convert action (i.e. a purchase or a form submit) and it is accepted.
- The conversion is reported to Opticks. This feedback is used as an input for the algorithms.
Limitations of Sensor JS integration
Due to the asynchronous nature of the Javascript language and how browsers work, in some extreme cases, the OpticksJS integration might fail in preventing some advanced fraud schemes. For example:
- A fast-acting fraudulent bot could potentially act before Sensor JS finishes executing.Since the webpage continues to be rendered while Sensor JS executes, there is potential for someone to click on a button or perform any action before Sensor JS finishes the analysis.
- Malicious code or custom browsers could also completely block access to Opticks servers, thereby disabling the Sensor JS.
One possible way to mitigate these risks is by hiding some key content until Sensor JS responds, such a particular button. A callback function could unhide the web content upon a successful response from Opticks as explained here. Another option is implementing server-to-server Security Checks, which are intended to reassure some visitor was analyzed by Opticks, and that the analysis was not tampered in the client side. Documentation is available here.